Medieval
Sewing Techniques:
Stitches, Seams & Sewing
STITCHING - CONSTRUCTION TIME - JOINING FABRIC
- HEMMING - NECKBANDS - EYELETS -
EYELET CONSTRUCTION - BUTTONHOLE CONSTRUCTION - CLOTH BUTTONS
-
TASSELS - LUCET CORD - REINFORCED EDGES
 Methods
of sewing, joining seams and making eyelets and buttonholes is
a topic of great interest to many historical costumers and re-enactors. Methods
of sewing, joining seams and making eyelets and buttonholes is
a topic of great interest to many historical costumers and re-enactors.
Contemporary sewing guides
say a little about actual techniques, and snippets of information
come to us from other sources- such as a few extant garments scattered
the world over, and from written advice.
One snippet to a young housewife when caring for fabric that it
should be 'sprayed by mouth as a tailor sprays water on the
part of a dress he wishes to hem.'
This tells us that it was fairly common practice for a tailor
to dampen a hem with water as it is being sewed.
Construction
time
Making clothes was a time-consuming business, More than one person
might work on a garment at a time, which can make it difficult
to determine how long it took to make something. Housewives might
also work on a garment or outfit sporadically.
A little information
about the time and costs of making garments comes to us from the
Great Warderobe accounts from the English Royal Family in the
14th century, and from this we can estimate the time taken to
make certain things.
A pair of hose: about
half a day.
A cloak: 3 - 6 days depending on whether it was lined or not.
A supertunic: 3 - weeks depending on whether it was lined or
not.
A tunic: 1 - 6 days depending on complexity, lining etc.
Based
on my personal sewing experience, these times are all achievable,
with exception of the hose, unless the seams are left raw, which
would make the feet extremely uncomfortable.
Some special purpose clothing appears to have been commisioned
on very short notice and may not have has the finishing quality
of garments which were to be worn again and again.
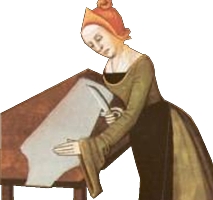 The
image at right is a detail from a 15th century illumination showing
a woman cutting and patterning. The
image at right is a detail from a 15th century illumination showing
a woman cutting and patterning.
Stitching
methods
There is a common misconception about the quality of medieval
clothing.
Many suppose that because sewing machines were not invented, the
stitching and quality of clothing was rough or poor. This is nothing
more than a gross insult to our women forebears.
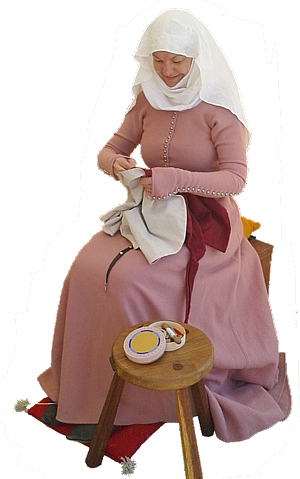
It must be remembered that as everything was hand-stitched,
sewing was a skill that a young girl would attain great proficiency
in at a very young age. By the time a young woman was sewing clothes
for herself or her family, a considerable level of skill could
reasonably be expected.
Even a poor woman with home spun fabrics would take care to provide
her family with the best sewing she could manage to produce garments
which would be both warm and durable. Shoddy workmanship would
lead to clothing falling apart at the seams whilst the fabric
was still serviceable- a waste that the poorer woman could not
allow.
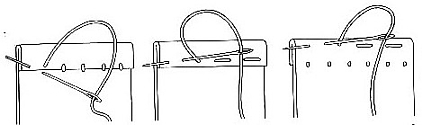
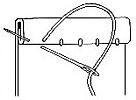
Methods of stitching fabric
were fairly simple. Shown above:
Method 1. Fell stitch.
Method 2. Running stitch.
Method 3. Combination fell and running stitch for added durability.
Joining
fabric together
Different methods were employed for the joining of different fabrics.
For a comprehensive look at archaeological sewing, please visit
Heather Jones's website ARCHAEOLOGICAL
SEWING.
I will not reproduce all the information here when she has done
such a huge amount of excellent research already.
Three simple methods of joining
fabric together are shown here-
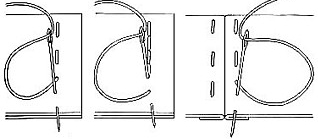
Method 1. The fabric
is laid with the outer sides together. A running stitch joins
the fabric.
Method 2. A backstitch provides greater strength for a seam.
Method 3. A more time consuming method of seams utilises an
initial join which is then opened flat and overstitched with
two lines of running stitch. This third method makes a very
solid and flat seam.
The images shown here and
those shown below are taken from the Museum of London series
of books about medieval clothing and remains their property.
 Hemming Hemming
If a selvedge could be used, it did away with the need for a hem.
Cut edges, of course, required hemming to prevent fraying.
The fell stitch, shown at right, was most common. The fabric is
folded under and the folded again and stitched into place is depicted
below along with variations: combined with a running stitch and
a running stitch used alone.
The Goodman of Paris in the late 14th century advises his wife
that fabric should be:
'sprayed by mouth as
a tailor sprays water on the part of a dress he wishes to hem.'
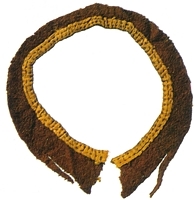 Neckbands Neckbands
This example of a neckband shows that a silk strip has been sewn
to the inside of the neck of a high-grade woolen garment.
A band like this one would provide extra re-enforcing where wear
and tear is likely to occur. The opening reinforcing is made from
a narrow silk strip. It is dated between 1325 to 1350.
It is possible that this
garment or others like it had similar bands at the ends of the
sleeves to reinforce the edges which were subject to the most
wear.
Eyelets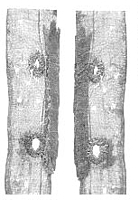
Without the use of zips, dresses were fastened by either buttons
or lacing. It was more likely that the underdress was laced, providing
and smoother and flatter silhouette and a more snug foundation
garment. The outer dress was more likely to be fastened with ornamental
buttons which were rounded or ball-shaped rather than flat.
Shown at right, a detail
of eyelet holes on silk facing from a deposit dated at the 14th
century. Traces of woolen cloth from the original garment are
able to be seen at the edges of the facing band also.
Eyelets and lacing holes on kirtles were generally no more than
2cm apart. Placing the holes any further apart and the lacing
would not prevent the dress from gaping unattractively. A well-made
eyelet was as strong as the metal ones we use today.
Eyelet
construction

Take a tape measure or ruler
and mark out the eyelets at no more than 2cm intervals. When you
have marked the eyelets so they are evenly aligned on both sides,
you may remove the tacking stitch. Using a double thread or a
thickish linen thread, backstitch a circle around the marked hole
to provide re-enforcement. It will also give you a guideline to
keep your eyelet where you intended and prevent it becoming lopsided.
Using an awl, pierce the
fabric carefully pushing the threads apart.
It is very important that you do not tear or cut the cloth or
your eyelet will lose some of its strength or tear under pressure
or repeated wear. Make 4 stitches north, south, east and west
to hold the hole open and gently use the awl to reopen the hole.
All that remains, it to sew
around the circle with close stitches, using the awl from time
to time to keep the hole open. You will be surprised at how sturdy
the result is.
Buttonhole
construction
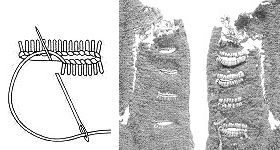 Similar
in construction to the eyelet, the buttonhole is achieved as shown
in the picture. The main difference in construction is that the
buttonhole always needs be cut before stitching. Similar
in construction to the eyelet, the buttonhole is achieved as shown
in the picture. The main difference in construction is that the
buttonhole always needs be cut before stitching.
The blanket stitch is then used to go around the opening. Buttonholes
were usually, but not always, sewn onto a garment which was reinforced
with a strip of silk or linen fabric for re-inforcement.
Buttonholes, like eyelet
or lacing holes, were very close set and always ran at right angles
to the edge of the opening of the garment. Care must be taken
to make the buttonhole not too large as it will open a little
with sewing.
The images shown here are
taken from the Museum of London series of books about medieval
clothing and remains their property. The image shows buttonholes
at the edge of a woolen garment from a deposit dated to 1325 to
1350.
Sewing
Tutorials
I have a few tutorials
showing how to make eyelets, buttons and buttonholes as well as
how to make the lucet cord which is handy for lacing gowns or
for using for drawstrings on pouches.
Look for them on the Pattern and DIY page HERE

Copyright
© Rosalie Gilbert
All text & photographs within this site are the property of
Rosalie Gilbert unless stated.
Art & artifact images remain the property of the owner.
Images and text may not be copied and used without permission.
|